
tl;dr
- If you're running AI agents you should run them in a secure container
- If you're running multiple agents against the same codebase you should be using `git worktree`
- I'll show you how I run multiple agents with multiple worktrees in a secure container
- Some repos I've published around this workflow are available here.
Before AI came along, my coding workflow was something like this: open up IntelliJ, checkout a branch, start coding. Sometimes I would switch between branches to review someone else’s code, or maybe just to tackle a different problem for a bit. On rare occasions I would use git worktrees to checkout multiple versions of the code, usually to solve a regression. Occasionally if I needed help with something I would look things up on Google and Stack Overflow. Maybe I would pair-code with a coworker. Today, I’m working in a secure container that has several worktrees checked out at any given moment, each with their own associated terminals, IDEs, and AI agents.
Things have changed for me, to say the least. Looking things up on Google and Stack Overflow is a rarity. I’m planning with Claude, I’m asking questions and getting answers from Claude; and when it comes time to code, Claude is doing most of the coding. I have become The Architect, commanding my army of AI Agents through a terminal multiplexer.
The What and Why of the Tools
Before I get into the nitty-gritty of my development workflow, let’s talk about the tools I’m using, what I would suggest you use, and why.
Note: The following requires some precursory knowledge about docker containers, terminal usage, and various
terminal tools (like git and ssh). If you don’t have some familiarity with those tools you might need to brush up
before this article is useful to you.
Containers
Imagine you’re pair-coding with your coworker. However, this coworker is not your average trustworthy collaborator that’s been working alongside you for years. They’re faster, cleverer, and often masters in the art of subversion (and I’m not talking version control). At times they will receive updates that can change their entire personality! But most importantly: unlike your coworker (hopefully), they cannot be trusted to not blow up the system or exfiltrate private data whenever they are given the chance.
If you’re using the workflow I’m about to outline, this problem is only amplified as you’ll be working with several of them at once with each of them capable of calamity at any moment.

The name of the game is risk mitigation. You want to make sure that if they do something stupid it’s not a big deal.
Containers allow you to limit their access to the rest of the system. They allow you to provide them with a scrutinized set of command-line tools they can use. And finally, the container can be configured to control the access the agents have to the outside world.
Even before Agentic coding was a thing, containers have been immensely useful for automating the quick setup of a system environment. I’ve been coding in my own custom container for quite some time. Here’s my container’s Dockerfile if you would like to do something similar.
Anthropic also provides their own Claude Code devcontainer which you may use.
As I start explaining my development workflow I will describe why I specifically do not use a “devcontainer” myself and instead rely on my own container. But for yourself, just make sure you have some kind of sandbox setup for your AI Agents and don’t implicitly trust them to always do the right thing.
Git Worktrees
Worktrees are a powerful, but relatively unknown, feature of git that allow you
to checkout multiple git branches at the same time. Ideally you will have multiple agents working on multiple things at
the same time. For instance, you may have one agent fixing a bug in a bugfix-branch while another implements a feature
in feature-branch. Because of this git worktrees will be essential.
Tmux
tmux is a
terminal multiplexer that gives you a structured way to manage
multiple terminals within a series of sessions, windows (tabs), and panes. Just as git worktrees give you multiple
workspaces in the codebase within which to work, tmux gives you multiple workspaces for the agents, shells, IDE
instances, and various tools that you will be using during development.
tmux also provides a server in the container that can persist beyond your initial connection. If you are accidentally
disconnected from your container you can reconnect and re-attach to the existing tmux session to continue exactly where
you left off. Your agents, as children of the tmux process, can also continue to run without you being connected to the
container.
Lastly, tmux also has the ability to listen to terminal bells and
highlight the appropriate tab/window when an agent has finished a task or is asking you questions. This is an important
feature for being truly efficient with your concurrently running agents.
Note: In Claude Code, sending notifications as terminal bells needs to be configured in /config.
Neovim
While I have been an ardent user of IntelliJ for over a decade now, it unfortunately doesn’t lend itself very well to my new way of working. While powerful, it has always been quite heavy and slow and isn’t designed to jump in-and-out of multiple coding sessions all at the same time.
My new IDE, Neovim, is a modern version of Vim. It is a terminal-based text editor which means that you can easily run it both over ssh and within tmux. Not only that, but you can easily start multiple neovim instances within multiple coding sessions. It can be heavily customized through a plugin system that provides power users most of the features that were present in something like Intellij or VS Code. Some things it can even do better (although looking pretty is not one of those things).
I personally started with LazyVim as a base and then customized from there. I would highly recommend it as a good place to get started if you don’t want to spend a lot of time tweaking Neovim.
Oh My Zsh and dotfile management with Stow
I have my container set up to use Oh My Zsh for my shell, but this is just personal preference. Stow, however, does some heavy work putting all the container configuration into the correct places. You should be using a dotfile manager like Stow (or chezmoi) whether you’re working in a container or not as it allows you to easily version control your configuration files.
Of particular note is my .zprofile with .zprofile.d/ directory pattern which allows you to add various env files to the container when started for the first time, such as anthropic keys.
The Agents (Claude Code in my case)
You can use whatever AI Agent floats your boat as long as it’s a terminal application. I use Claude Code but OpenAI’s Codex or Google’s Gemini CLI should be easily useable as well.
Setup and the workflow
Now that you understand the tools involved, let’s walk through setting everything up. It all starts from the dev repository.
Make sure a local ssh agent is running and available at $SSH_AUTH_SOCK. If
you’re using colima or docker desktop or some other software that runs the container in a VM you’ll have to make sure
that your keys are being forwarded to your VM. With colima that means colima start --ssh-agent.
The Dockerfile for this container uses my
dotfiles repo for configuring its local applications. If you want to use my dev
container I recommend forking both the dev and dotfiles repos, updating the Dockerfile to point at your dotfiles fork,
and then replacing my public keys with your own.
git clone git@github.com:snapwich/dev
# build the container in the background
./up --build -d
# see the container running
docker ps
You can also add other ./ssh/authorized_keys by using ./dsh to shell into the container and copy/paste them or
transfer them using scp. ./dsh puts you in the container as the
default dev user. ./dsh root puts you into the container as root; this is useful if you want to add system
dependencies or configure the container after it has been created. The default dev user is a passwordless account with
limited sudo and you cannot ssh into the container as root, both for security reasons.
At this point, I clone any repositories I am working on inside the container, add any necessary env files, and install
any applications that I haven’t added to my Dockerfile.
ssh dev@localhost -p 2222
mkdir -p ~/repos/richsnapp.com
git clone git@github.com:snapwich/richsnapp.com ~/repos/richsnapp.com/default
npm install -g pnpm @anthropic-ai/claude-code

nvim ~/.zprofile.d/anthropic-keys.sh # add necessary env files
SSH Config
When ssh’ing into the container you’ll probably want to forward some ports from your container to your host machine,
disable log output (to prevent channel errors interfering with nvim and such), specify the custom port, etc… It
would normally look something like this:
ssh -p 2222 -q dev@localhost -L 4321:localhost:4321Rather than remember to type all that I usually set up an
ssh config that I bind to a DNS name that I create for my
container. In ~/.ssh/config on the HOST machine:
Host dev.home
User dev
Port 2222
IdentityFile ~/.ssh/id_rsa # private key associated with authorized_keys in container
LogLevel QUIET
LocalForward 4321 localhost:4321
Then getting into the container to start working is as simple as ssh dev.home.
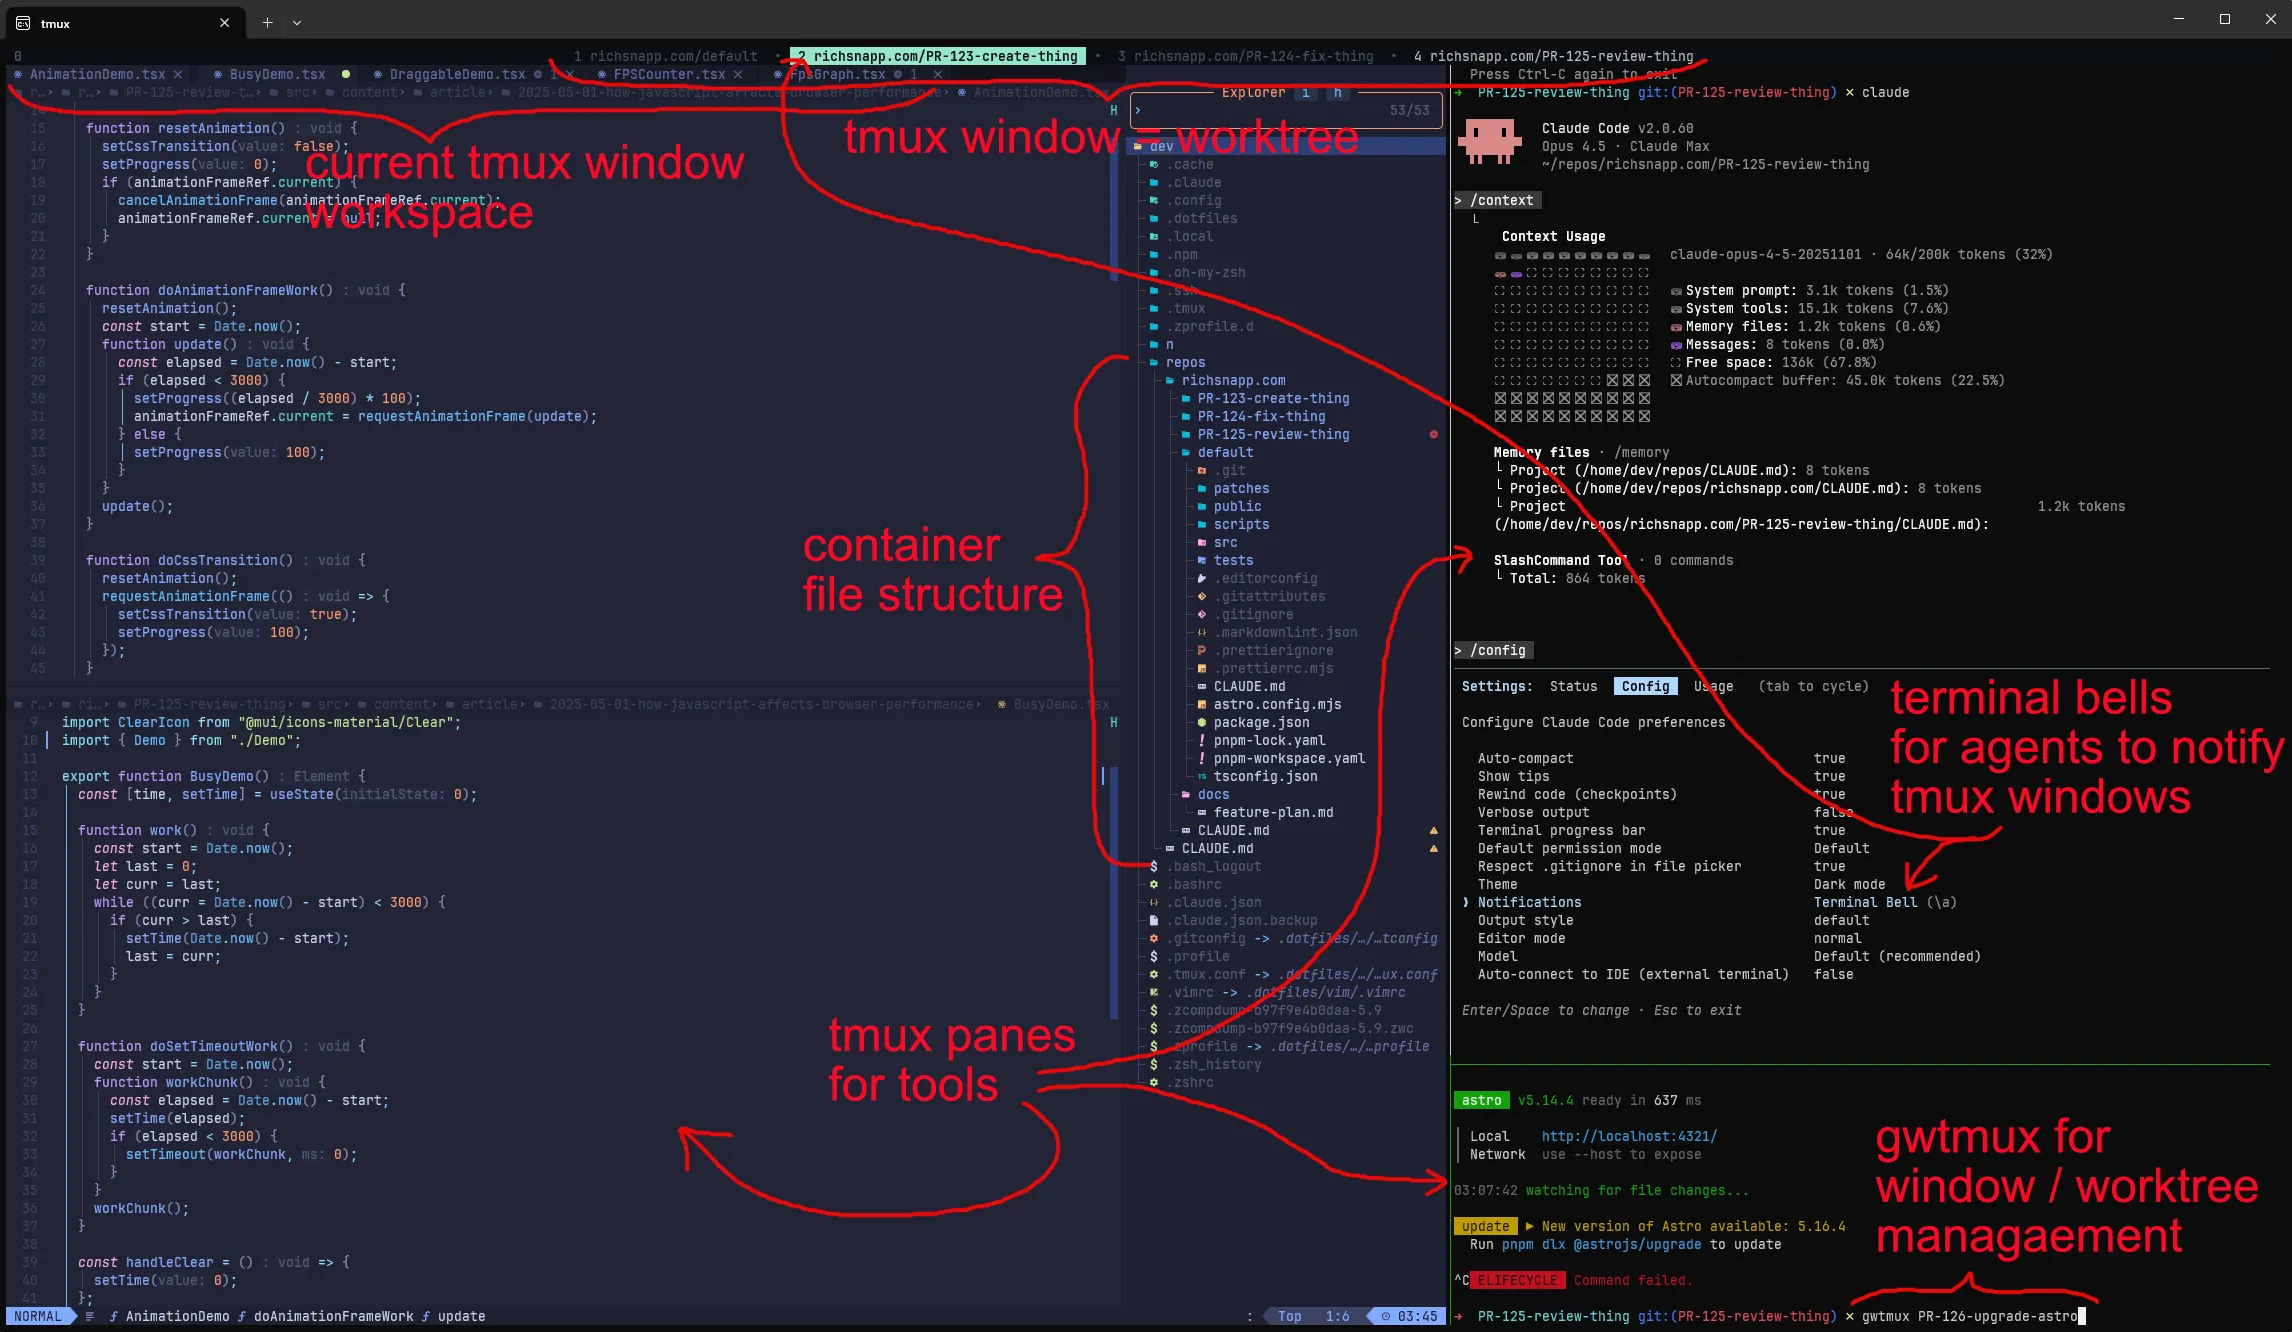
Directory structure
You may have noticed when I cloned my work repo above I cloned it into a default folder inside the folder that is the
repo’s name. This is the ideal structure I’ve found for working with git worktree. The default directory being the
actual repository usually checked out to main / master (but it can be checked out to anything, think of it as a
temporary scratch workspace) with all the additional worktrees being siblings to default.
repos
└── richsnapp.com
  ├── PR-123-create-thing
  ├── PR-124-fix-thing
  ├── PR-125-review-thing
  ├── default
  └── docs
Modeling the repository like this allows you to easily locate and work within a worktree or even multiple worktrees with
your agents (e.g. /add-dir ../PR-124-fix-thing in Claude Code). Shared files such as architectural documents,
instruction files, plans etc can also live as siblings next to the default folder that all the worktrees can share (e.g.
/add-dir ../docs).
git commands can be run like normal in any of the worktrees. You can even use git commands in the parent folder
using git -C default <cmd>.
The directory structure often proposed for worktrees is using a bare repo
and working around
the various gotchas
that come up with using a bare repo in a way it was not intended. I’ve found using a simple default directory
structure with a regular git repo is a lot easier to work with and really doesn’t have any downsides other than
requiring git -C default if you want to run git commands outside of the worktrees (which is rare).
The gwtmux command
The general rule that is followed for managing multiple worktrees at the same time is that 1 tmux window = 1 git
worktree and the worktree and the tmux window share the same name (barring some special characters). This can be done
manually pretty easily but as a convenience I created a function in bash that I use for managing worktrees and tmux
windows called gwtmux. If using my
dev container, gwtmux will be added and automatically sourced
at the start of every shell session making it available for use.
gwtmux is entirely vibe-coded… but have no fear,
it has tests.
Its usage is pretty simple and the commands can be run from any tmux window.
# create tmux window and worktree named after github PR
# (requires authenticated `gh` cli)
gwtmux 123
# create tmux window, worktree, and branch
# will create branch or checkout if exists local or remote
gwtmux my-local-or-remote-branch
# close tmux window (but leave worktree and branch)
gwtmux -d
# close tmux window and delete worktree
gwtmux -dw
# close tmux window, delete worktree, safe delete branch
gwtmux -dwb # gwtmux -dwB to force delete unmerged branch
# close tmux window, delete worktree, delete branches
# (local and remote)
gwtmux -dwBr
That’s the gist of it. You can also do some other things like gwtmux with no arguments to open ALL the worktrees that
exist in a folder with each in their own tmux window; or gwtmux -d <name> to close windows other than the one you’re
in, etc. Just some convenience methods.
Working on a feature in an isolated workspace is as simple as:
gwtmux feature-branch
pnpm install
nvim .
Putting it all together
Once everything is running I usually treat my container as a long-running dev machine. I have worked out of the same container for as long as 6 months before needing to recreate it. At other times I recreate it frequently. It should be treated as ephemeral, but if there’s no reason to recreate I’ll usually keep it going for convenience.
Be careful about putting files in there that you care about. Everything should ideally be checked into version control.
If you need to version control files scattered around your system (e.g. plans or doc files) you can reference them in a
centralized repo and stow --adopt them.
Usually at any given time I will have several worktrees created in my repo folders. The worktree directories usually
mirror the current features, bugfixes, or reviews I am working on. Once I’m done with a feature or piece of work I will
gwtmux -dwB it to remove it from my container entirely.
If I don’t have an active tmux session, getting all of my current work going at the start of the day is usually as
simple as gwtmux with no args in the repo’s parent directory (default/..) which opens all the available worktrees
for that repo.
If I do have an existing session that I detached from (ctrl-b d in tmux) at the end of the last day then it’s just
tmux attach to get all my windows and applications back in their current running state.
If you restart your host machine your docker container will be in a stopped state once you restart docker. You can
restart the dev container with ./up.sh in the dev repo. This requires that the
previous ssh-agent socket (usually in /tmp) that was originally used to create the container exists so it can be
re-mounted. ./up.sh will walk you through this process of recreating it if it doesn’t exist.
Downsides
The main downsides probably have to do with getting individual files into and out of your container, and not having an actual GUI display.
Most of your files are easy because they’re in code repositories that are automatically pulled from a remote. But
sometimes you might want to make an individual file (like a screenshot) available to an agent. In those cases you’ll
have to scp or docker cp the file to your container, which can be tedious. I have some ideas to improve this but
currently this is what I do.
Not having a GUI means you can’t do a few things. The only one I’ve really cared about is running Playwright in UI Mode. You can run headless playwright tests, and your agents can use things such as Playwright MCP, but anything that requires launching and running a GUI can be difficult. I’m sure I could get something working with an xserver but seems like more headache than it’s worth.
If you have easy solutions for either of those things let me know, but they’re only rare annoyances for me.
What you get
- Support for multiple git worktrees for you and/or the agents
- Support for multiple agents
- Multiple instances of a powerful IDE in each worktree, or a single instance that can easily work across multiple worktrees
- An isolated and secure container to protect yourself from agent shenanigans
- A tmux parent process to own and persist your child processes and agents
- A totally free (well, your Agents will probably cost you) and flexible development environment
FAQ
Why not use devcontainers instead of running your own Dockerfile container?
While I definitely recommend using devcontainers if it makes sense to you, for me they’re somewhat antithetical to this workflow. Devcontainers are usually meant to be coupled to a single IDE instance on the host machine which then runs a single container for that instance. It makes the code workspace available to the container through a bind mount. Meanwhile I’m suggesting running everything in the container, including the IDE and the code. I avoid bind mounts wherever possible due to security and performance related reasons.
I could potentially run a devcontainer while disabling all the things I don’t want it to do… Or I can just create my own container and only add the things I specifically want it to do. In other words, for me it is an abstraction that doesn’t add any value over what I currently have.
Why go through all the hassle of forwarding $SSH_AUTH_SOCK socket from host instead of just using an SSH ForwardAgent per session?
The SSH session lifecycle and keys are meant to be tied to the host’s lifecycle and keys rather than the lifecycle and keys associated with a single connection. For example, if you forwarded keys on connecting and started a tmux process that persisted beyond the lifespan of your connection it would lose access to the ssh keys once you disconnected.
- Can I run
tmuxon the host instead of in the container? You can but probably shouldn’t. One of the main benefits from running tmux in the container is having a parent tmux process that adopts your child processes if you get unintentionally disconnected. You could run
tmuxon both the host, and in the container but you should probably avoid nesting tmux sessions if you can.- What
tmuxhotkeys should I have memorized? ctrl-b c # create new tmux window (if you want to make one outside of gwtmux) ctrl-b % # create vertical split tmux pane ctrl-b " # create horizontal split tmux pane ctrl-b <num> # switch between tmux windows ctrl-b q <num> # switch between tmux panes ctrl-b z # toggle zoom/fullscreen for the current pane ctrl-b d # detach from tmux session. use `tmux attach` to reconnect ctrl-b [ and ] # tmux scroll, visual selection, and copy/paste mode ctrl-b I # this will install tmux extensions after first setup. run once ctrl-b ? # help menu for more tmux commands- What
nvimhotkeys should I have memorized? This could be multiple blog posts… But you should know the
vimbasics plus some of the additional <leader> hotkeys made accessible through the various nvim plugins that you care about.- Can I do this without the hassle of setting up the container?
You can, but I highly recommend against it for several reasons:
- It’s quite the process to get this all set up for the first time and having it automated as a Dockerfile greatly simplifies things.
- Agents can (and have, in my case) blow up your system which can really suck. However, only losing your container to agent malfeasance is just a minor annoyance.
- Agents cannot be trusted. Anything inside your container can potentially be accessed by the agent. This includes keys and various other sensitive data which can then be sent to the agent’s API endpoints or worse.
- The flexibility of having a secure, remotely accessible SSH container is nice.
- Working in a linux container can save you from ever seeing this prompt.
- How is this any better than using a WebUI such as Claude Code on the Web
For some people a WebUI is probably a better alternative. For me, I like to compile and run the code I’m reviewing when I do reviews. I like to tweak and edit code through my IDE when I’m adding features with an agent. If you’re like me, this process is a lot more powerful than just managing agents through a WebUI; and a much faster feedback loop.
Referenced repositories
- container setup: github.com/snapwich/dev
- dotfile configuration: github.com/snapwich/dotfiles
- easy worktree/tmux management with
gwtmux: github.com/snapwich/gwtmux
Let me know what you think or if you have any questions feel free to post them below.